





Guide
From download to captions in Premiere in about five minutes.
1. Install
- Download
DynCap-Windows.zipand unzip it, for example to your Desktop. - Open the
DynCapfolder and double-click DynCap.exe. Keep it next to its_internalfolder. - Windows may say "Windows protected your PC" because the app isn't signed. Click More info → Run anyway. You only need to do this once.
2. Caption a video
- Finish your edit first. The captions follow the final audio.
- In Premiere, export the audio (File → Export → Media, MP3 or WAV), or use the full video file.
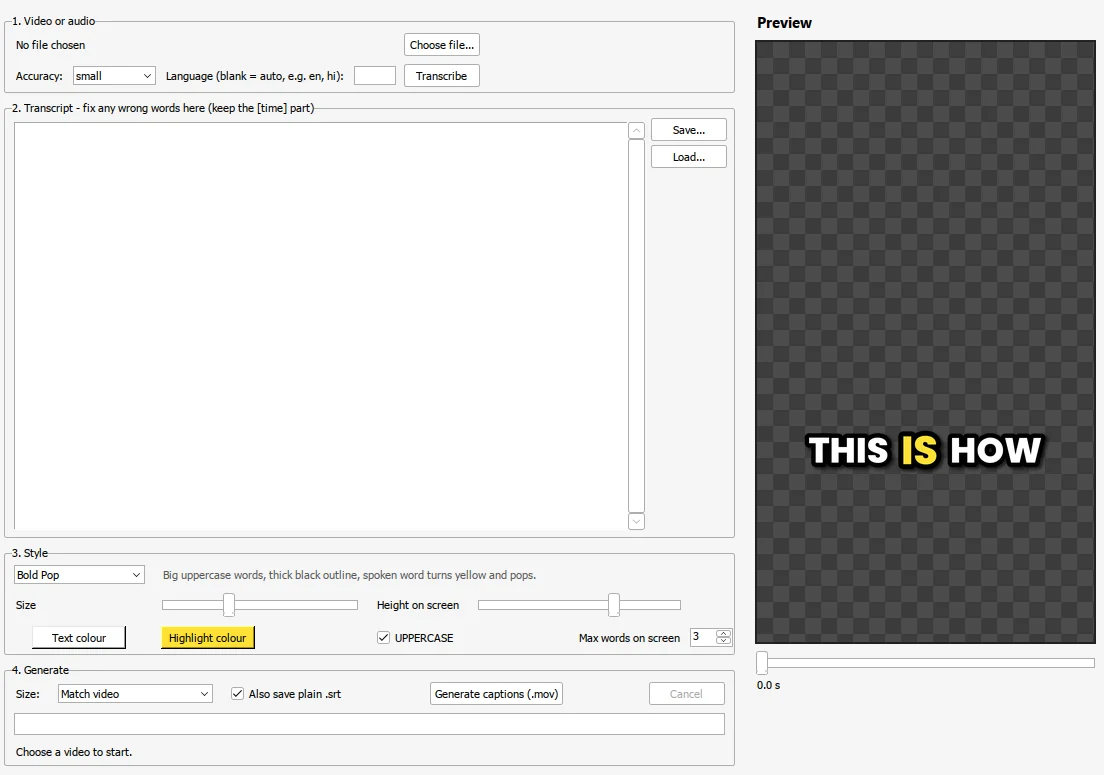
- In DynCap, click Choose file… and pick it.
- Click Transcribe. The first time, it downloads the speech model (about 480 MB, once). A 1-minute clip then takes under a minute.
- Read the transcript and fix any wrong words. Change only the words and leave the
[00:01.20 --> 00:03.40]part alone. - Pick a style and drag the slider under the preview to check different moments.
- Set Size to your sequence size, for example 1080x1920 for Shorts. This matters if you exported audio only.
- Click Generate captions (.mov). A 60-second clip takes about 2 minutes.
3. Into Premiere
- File → Import the
_captions.mov. - Drag it onto V2, the track above your video.
- Line up its start with the start of what you transcribed. If you exported the whole sequence, put it at 00:00.
The .mov shows a black background in normal video players. That's expected. The background is transparent and only shows as clear once it sits over your footage.
4. Fixing mistakes later
- A typo or a different style: open DynCap, click Load… on the transcript it saved, fix it, generate again, and replace the clip in Premiere.
- You changed the edit: the timing no longer matches. Export the audio again and re-caption it.
- Tick Also save plain .srt to get a normal subtitle file as well, which is handy for YouTube.
5. Speed vs accuracy
The Accuracy menu picks the size of the speech model. Each one downloads once.
| Model | Download | Speed | Accuracy |
|---|---|---|---|
| tiny | 75 MB | fastest | rough |
| base | 145 MB | fast | okay |
| small | 480 MB | good | good (default) |
| medium | 1.5 GB | slow | very good |
| large-v3 | 3 GB | slowest | best |
Language: Auto-detect works for most videos, but picking the language is faster and more reliable. For Hindi captions in Devanagari, choose Hindi - देवनागरी (hi). For Hindi, medium is noticeably more accurate than small.
6. Tips
- The
.movfiles are big because ProRes with transparency always is. Delete them once your project is exported. - If the captions cover something, change Height on screen and generate again.
- Max words on screen controls the pace: 1–3 feels punchy, 5–8 reads like subtitles.
- Clean audio gives better transcripts. Remove loud music before you transcribe.